New Light and Color Correction in Deep-Image.ai: Fix Color Casts Without Regenerating Your Photo
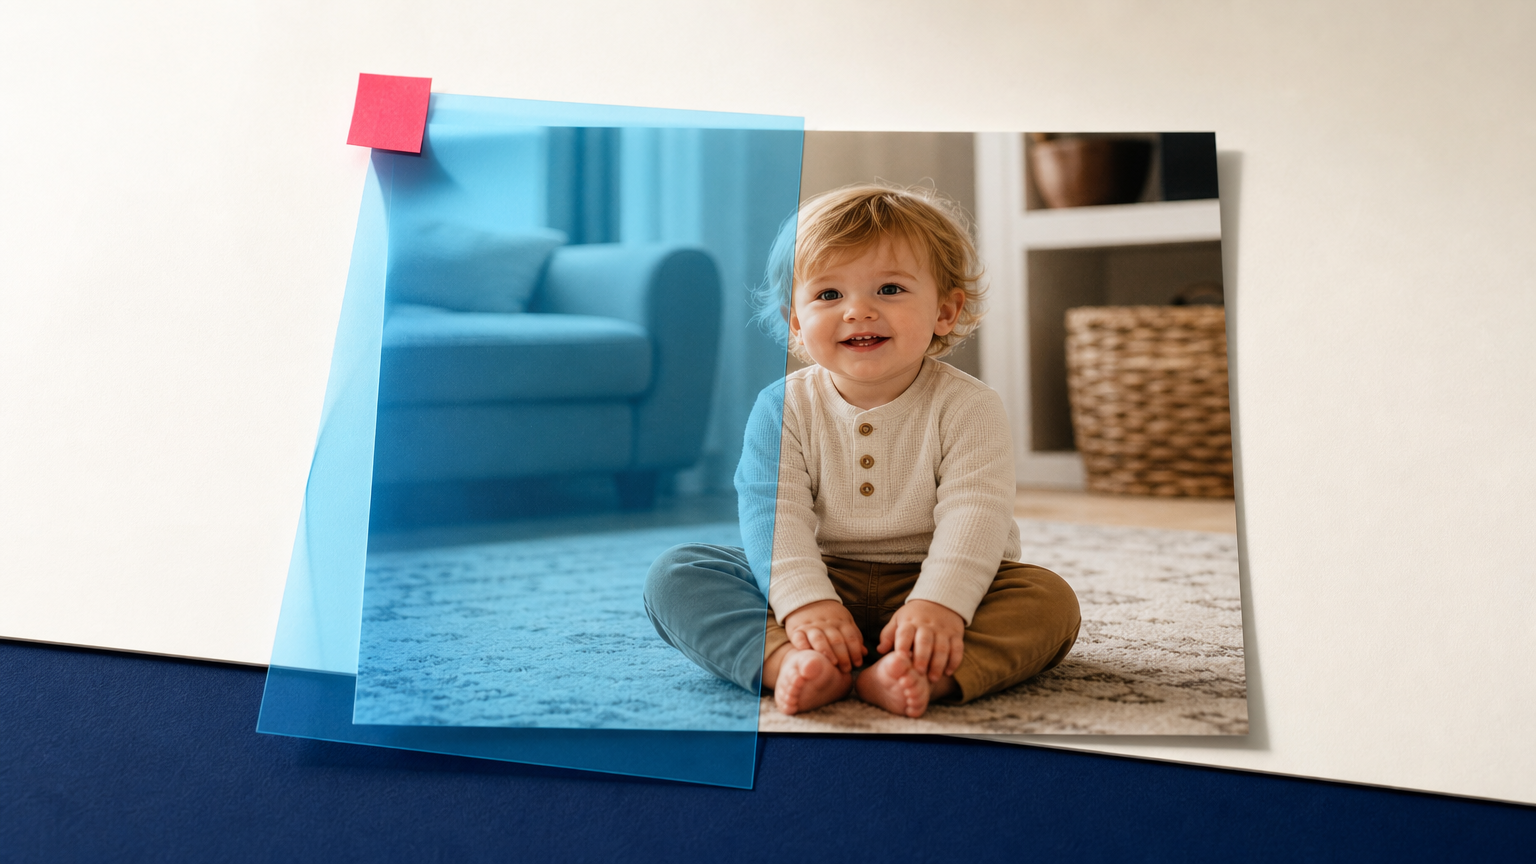
A photo can have the right moment, composition, and subject, but still feel wrong because the white balance is too cool, the colors are too intense, or the exposure hides important detail. Until now, fixing those problems often meant choosing between a quick global filter and a broader AI enhancement workflow.
We have added new Light and Color Correction controls to AI Enhancer Studio and AI Enhancer PRO. They are designed for a more focused job: adjust lighting and the color palette of an existing photo without regenerating the input image. The subject, composition, and image content stay in place, while you can correct the way the image is lit and balanced.
This makes the feature useful for photos with an unwanted blue or warm cast, muted colors, uneven-looking exposure, or a white balance that does not match the scene. If the source image is also too small, you can optionally add regular upscaling or Generative Upscale as a separate quality step.
What Light and Color Correction changes
Light and Color Correction focuses on the visual treatment of a photo rather than replacing its content. In practical terms, it can help you improve the relationship between highlights, shadows, contrast, color temperature, white balance, and saturation while retaining the original scene.
That distinction matters when the photo itself is already the right photo. A family portrait may have a strong blue cast from window light. A small wedding image may be overly warm, heavily saturated, and too dark in the shadows. In both cases, the goal is not to invent a new scene. It is to make the existing one look more natural and usable.
The advanced workflow offers a white-balance correction preset and adjustable controls for light transfer, exposure, contrast, white balance, and saturation. The underlying image-processing documentation also describes separate light, color, white-balance, and exposure-correction enhancements, so you can choose a correction path that fits the issue you can actually see.
Try Light and Color Correction in AI Enhancer Studio when you want to fix the look of a photo first, then decide whether it needs any additional enhancement.
When to correct light and color, and when to upscale
Lighting and color correction and image upscaling solve different problems. Start with correction when the photo has enough usable detail but the overall rendering is off. A color cast, poor white balance, excessive warmth, or flat contrast can make an otherwise good image look unconvincing.
Use upscaling when the file is too small for its intended destination, or when you need a larger working copy for a page, print, or crop. Generative Upscale can add detail, so it should be used deliberately, especially for people, products, and historically important images. It is not required for Light and Color Correction. You can correct light and colors while preserving the original image content, then add an upscale only if resolution is the separate problem you need to solve.
Example: reducing a strong blue color cast
In this example, the original photo of a child on a rug is dominated by a blue-purple tint from the backlit room. The scene, pose, and crop are already correct. The job is to bring the white balance and palette closer to a natural indoor result, not to generate a different photograph.
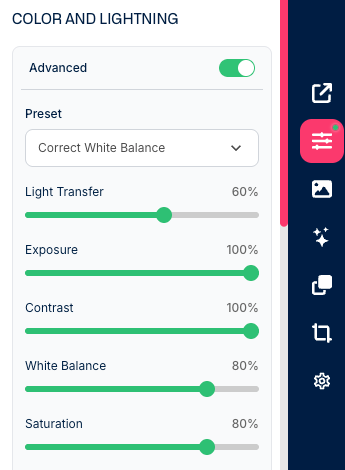
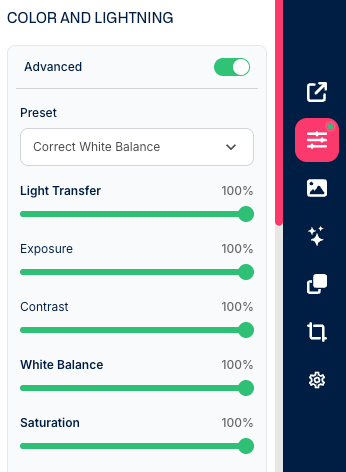
For a lighter intervention, the supplied settings use the Correct White Balance preset with Advanced enabled: Light Transfer 60%, Exposure 100%, Contrast 100%, White Balance 80%, and Saturation 80%. This reduces part of the cool tint while keeping a more stylized look.
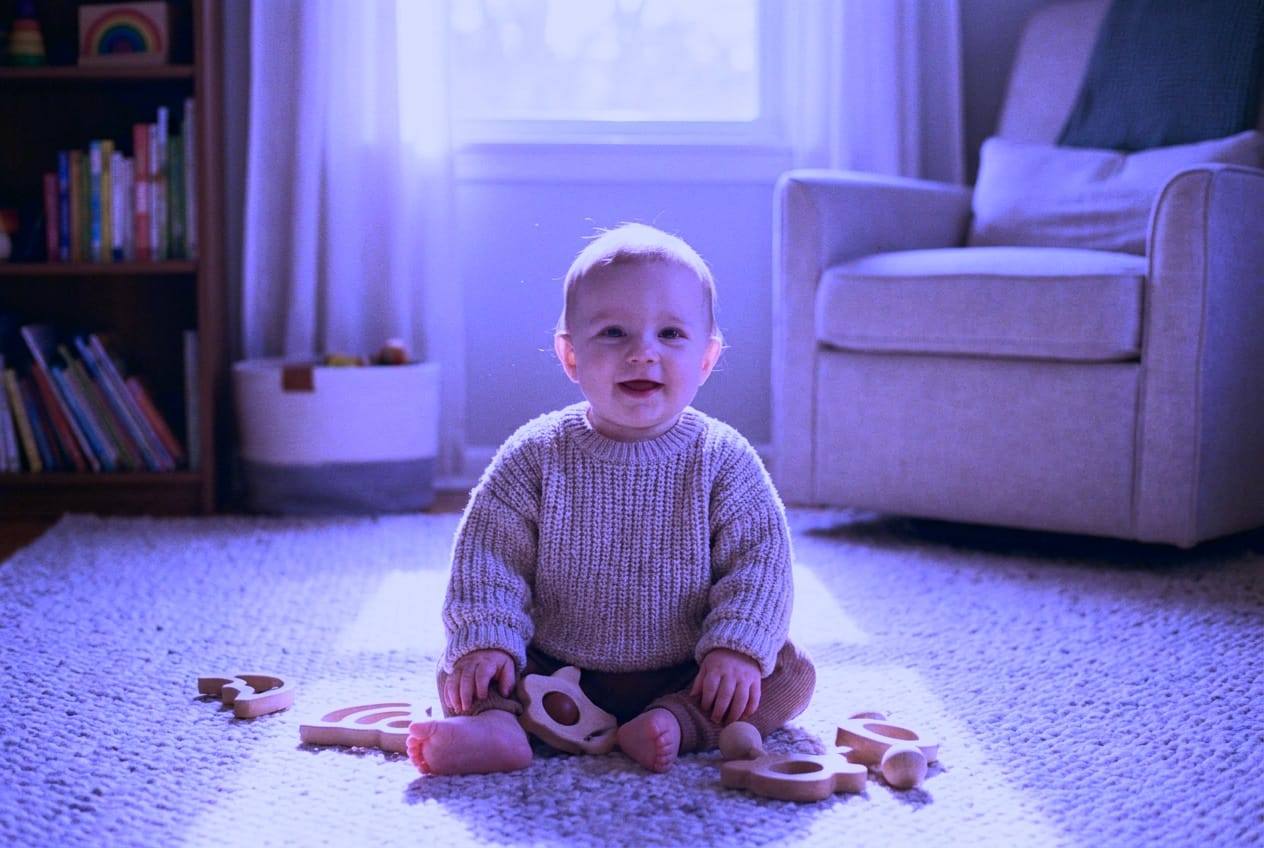
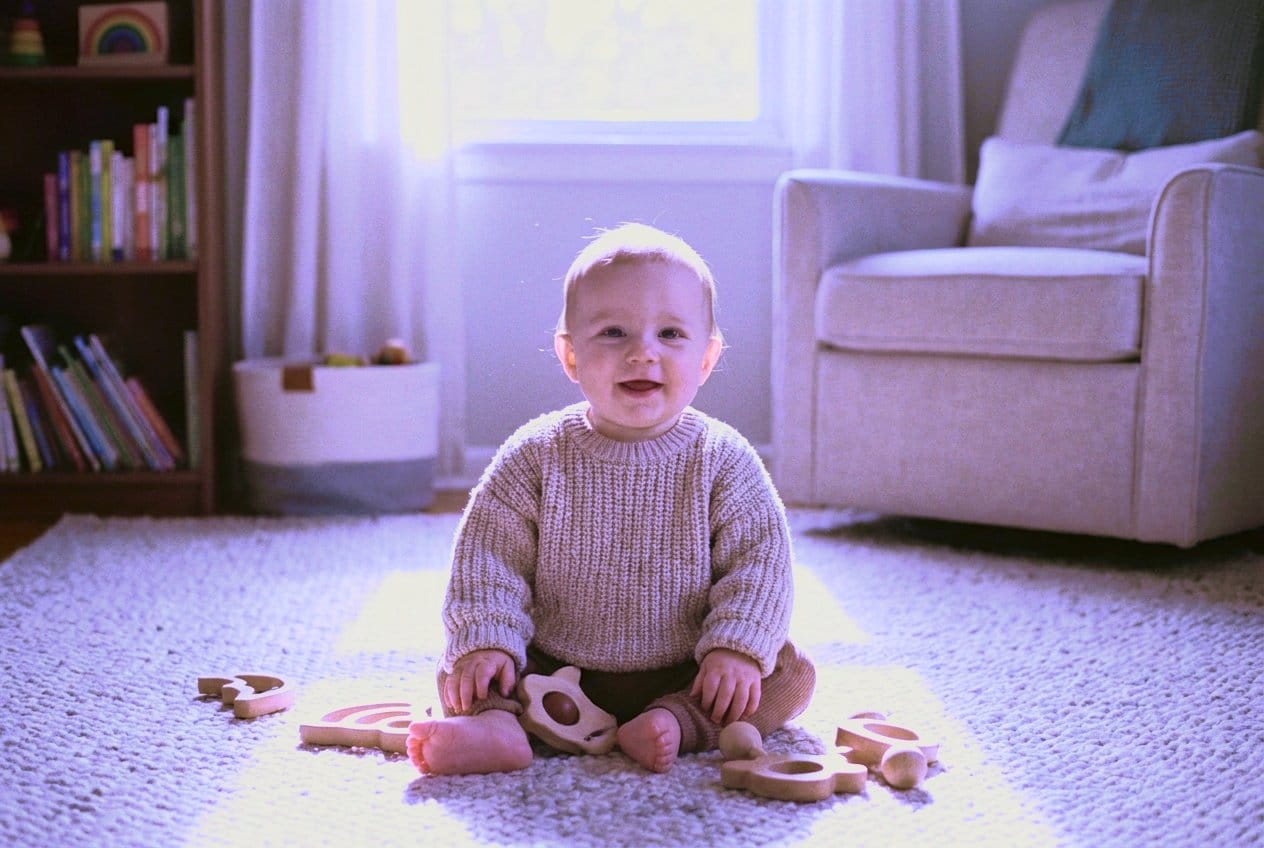
Before and after: a milder Light and Color Correction on the same baby-floor photograph.
For a stronger correction, the same preset is used with Light Transfer, Exposure, Contrast, White Balance, and Saturation all set to 100%. The result removes much more of the blue cast and gives the rug, curtains, and skin tones a more neutral appearance. This version is then enlarged with Generative Upscale at strength 1.
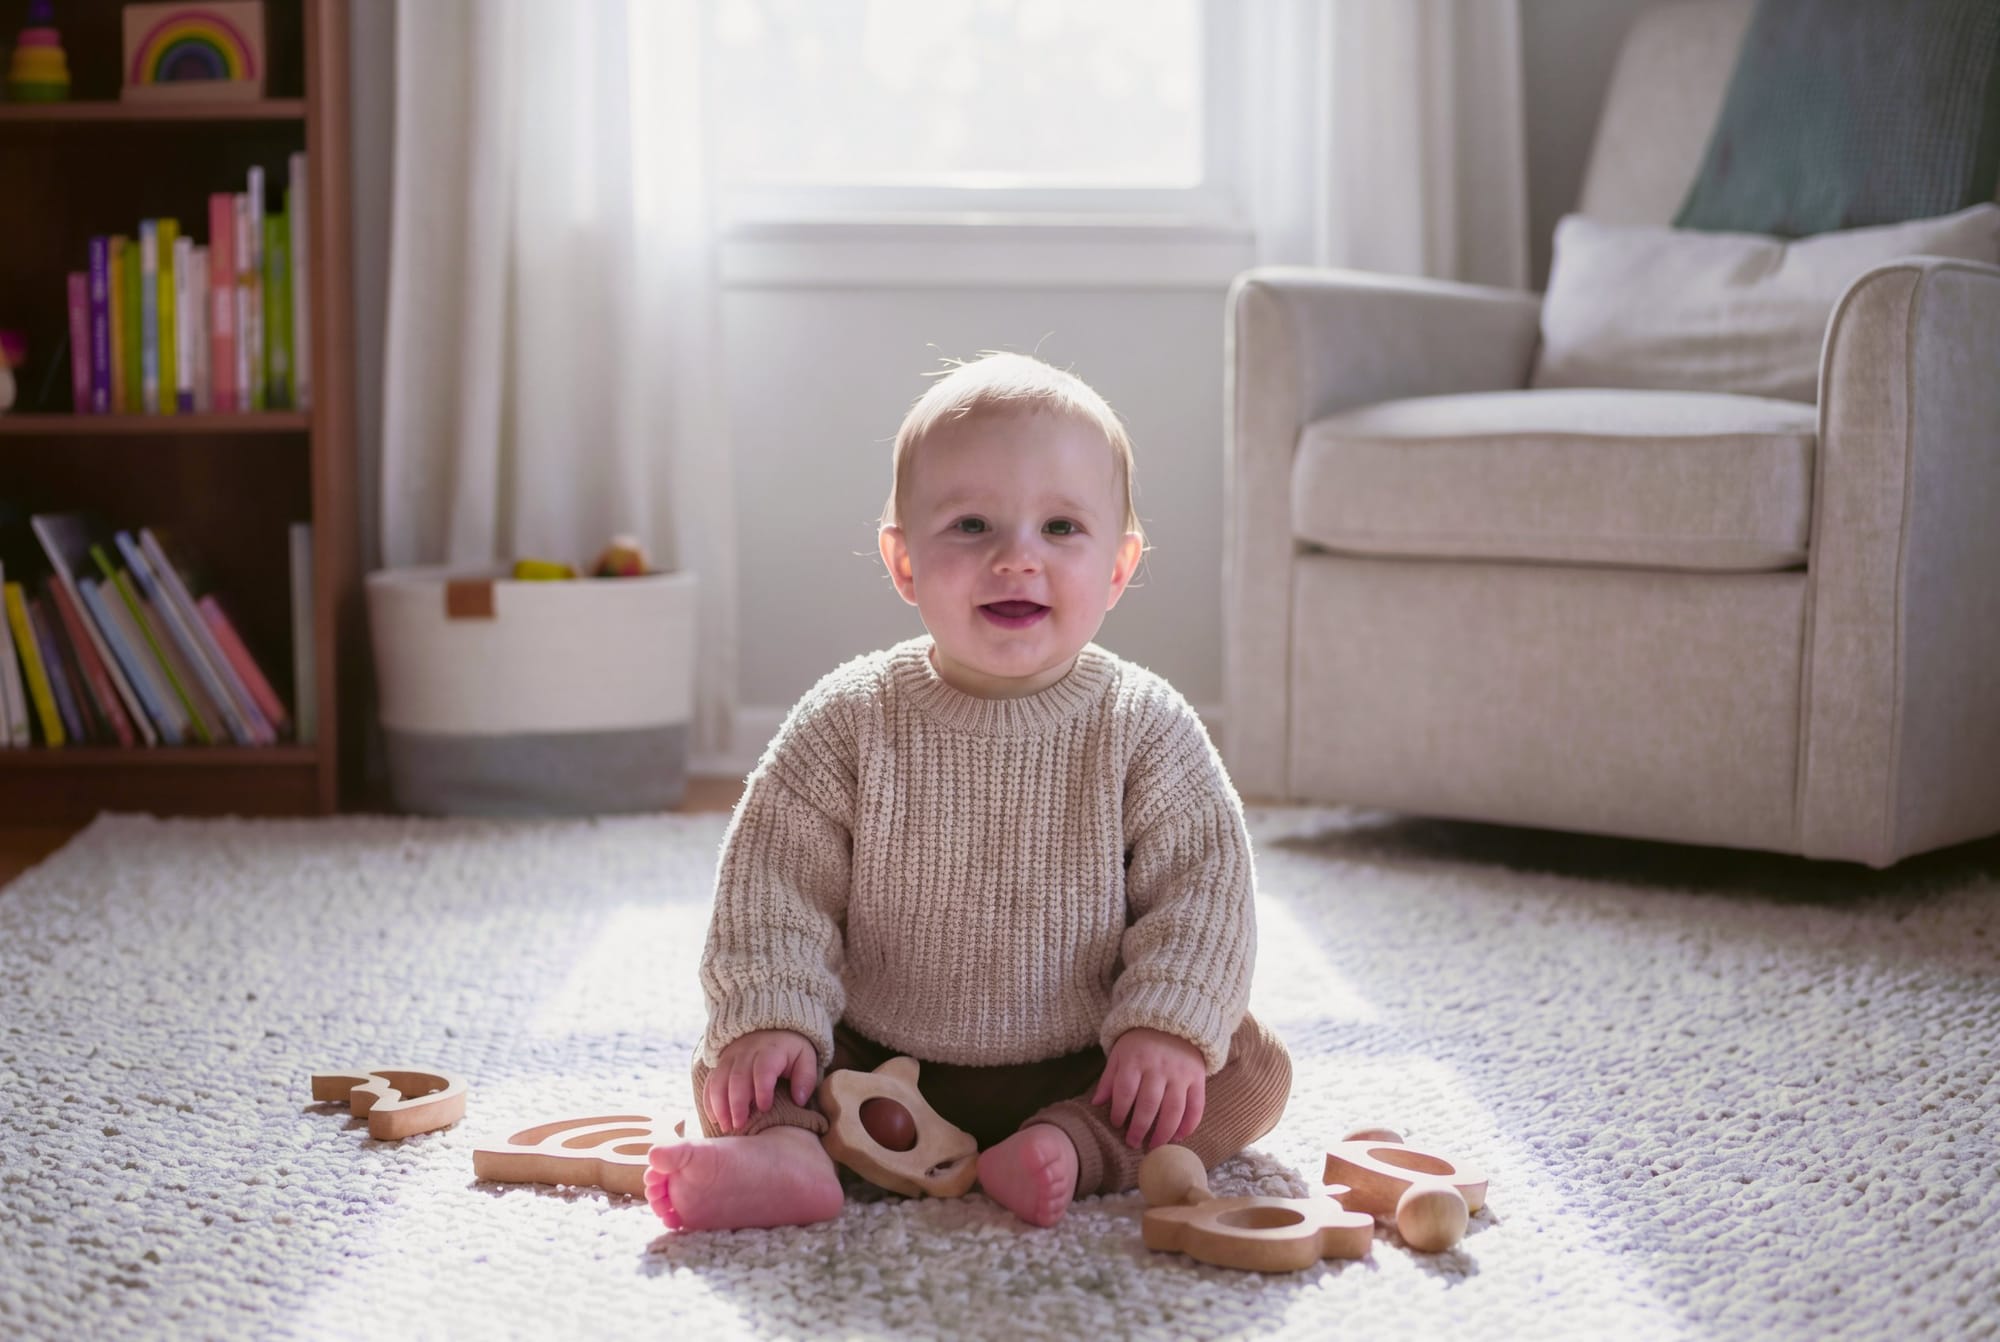
Before and after: full Light and Color Correction on the same baby-floor photograph, followed by Generative Upscale.
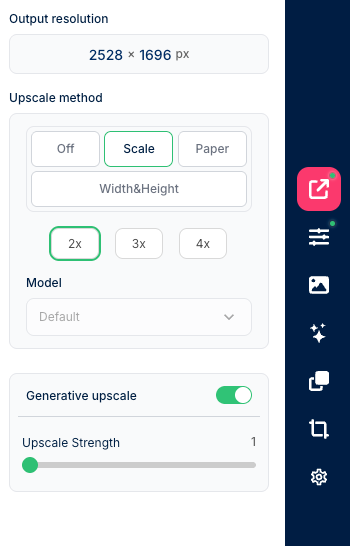
The enlargement step uses 2x Scale with Generative Upscale enabled at strength 1, a deliberately low setting. This is a separate detail-and-resolution choice, not a prerequisite for correcting the photo's light and colors.
Example: balancing a small wedding photo
The second example starts with a small wedding image in front of a fireplace. It has harsh contrast, very warm color, heavy saturation, and dark areas that conceal detail. Here, correction makes the image easier to read, while upscaling addresses the file's small size.
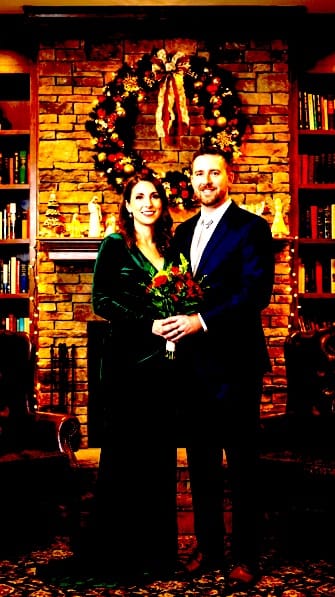
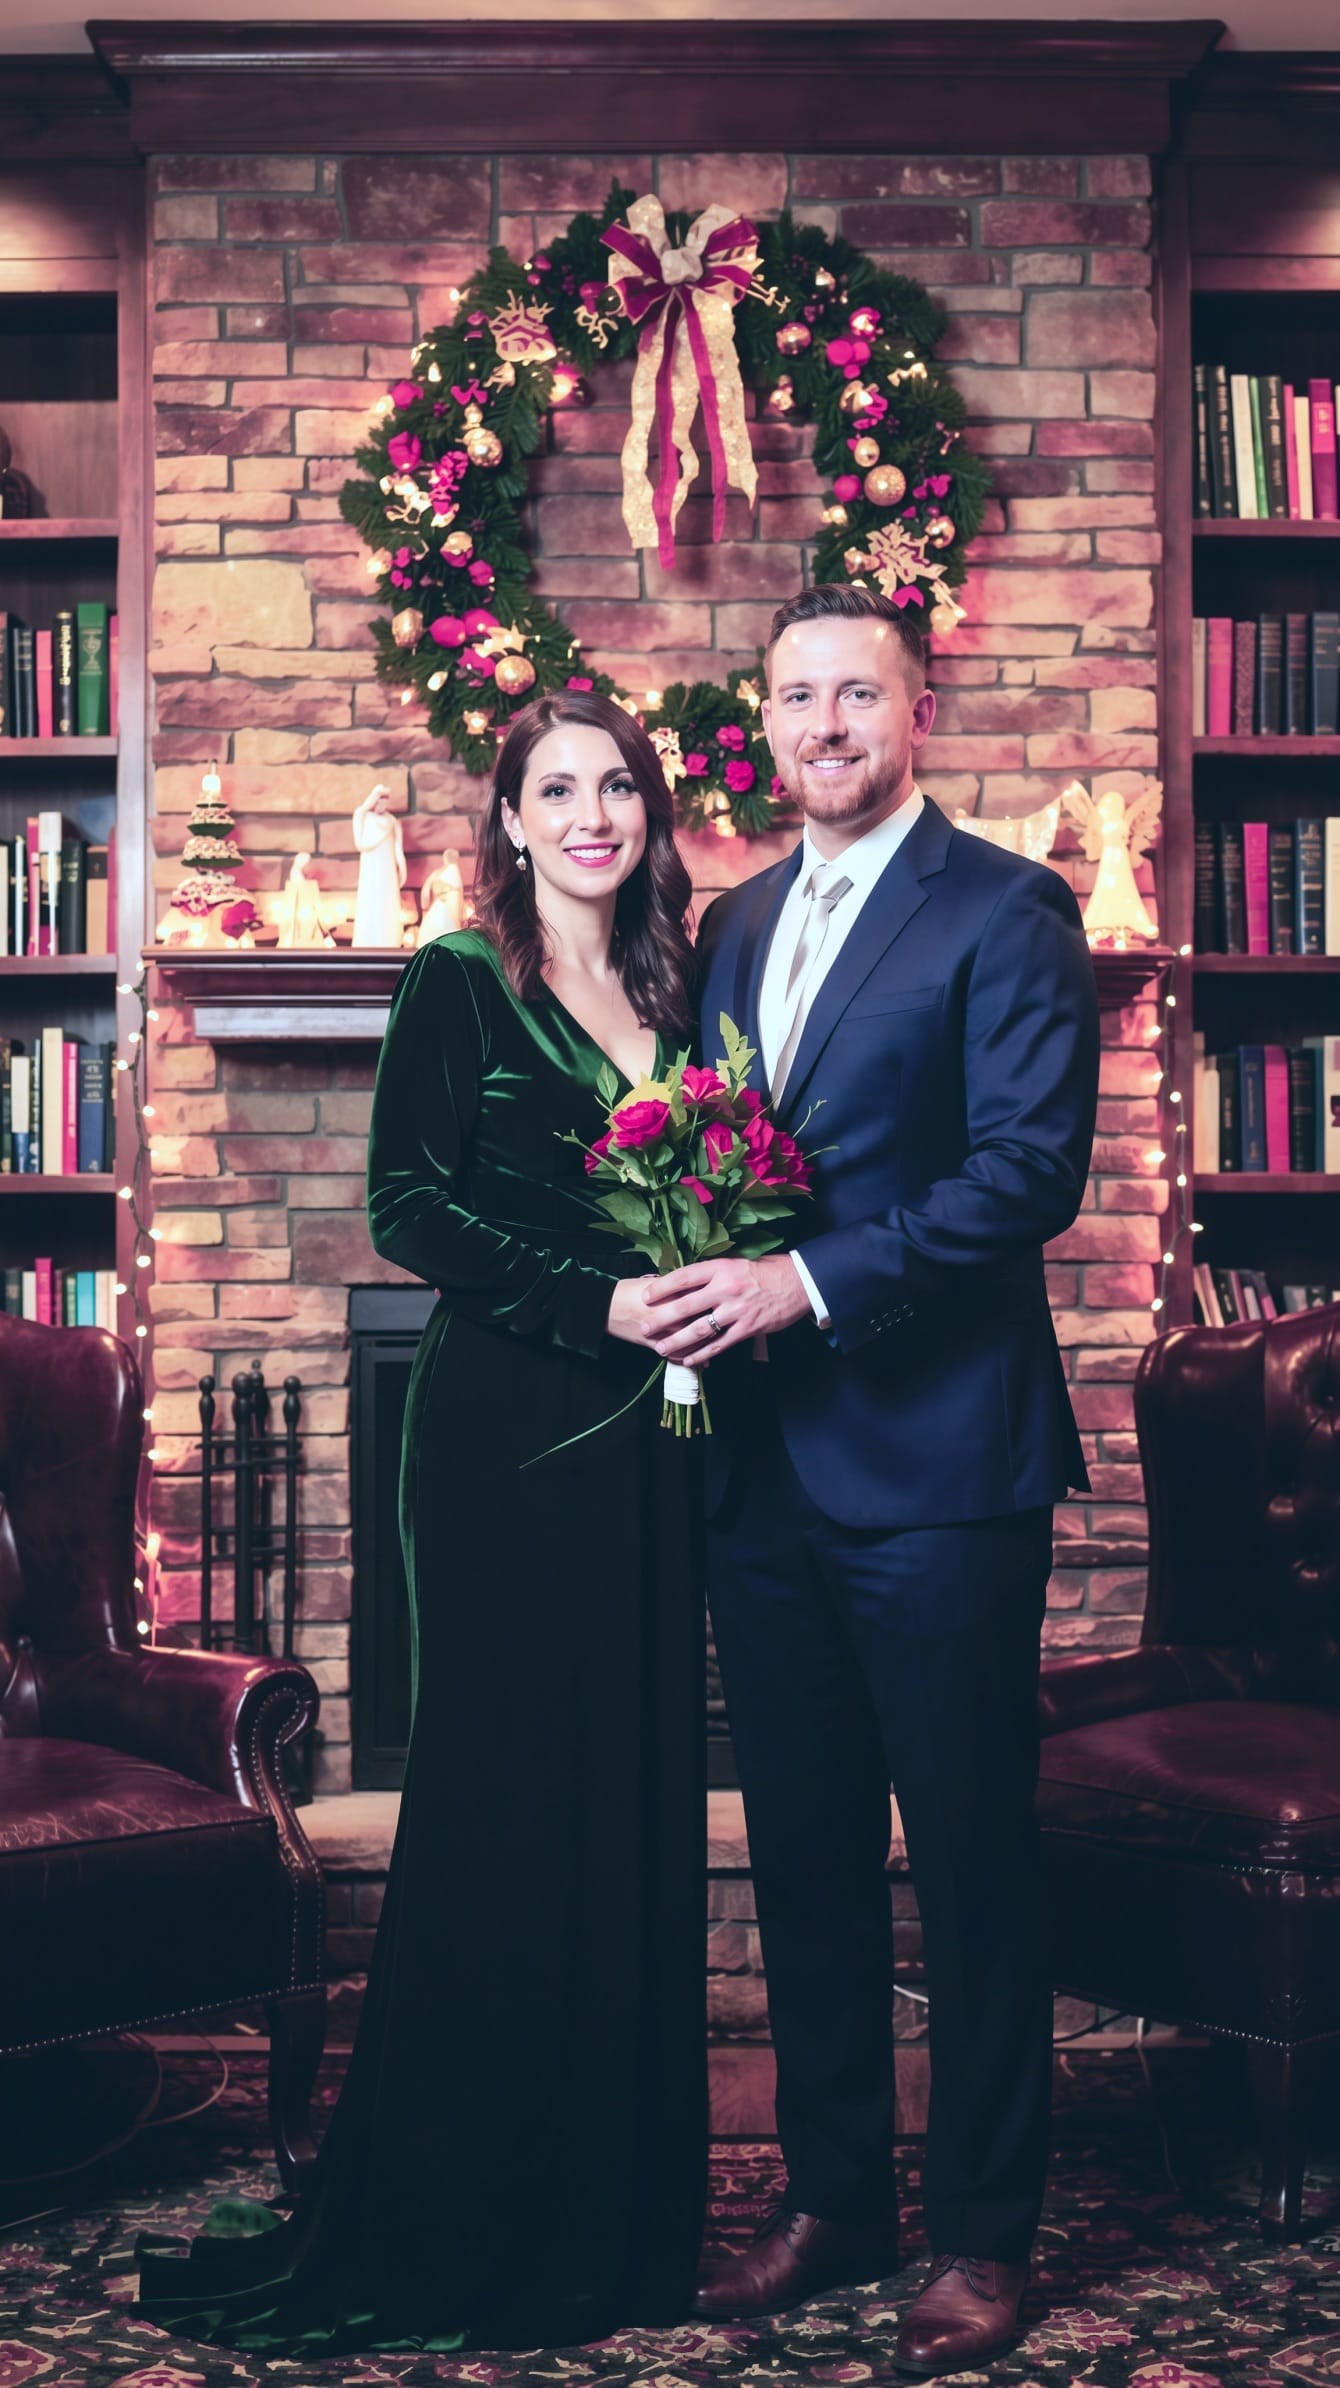
Before and after: the same wedding photograph after light and color correction, followed by enlargement.
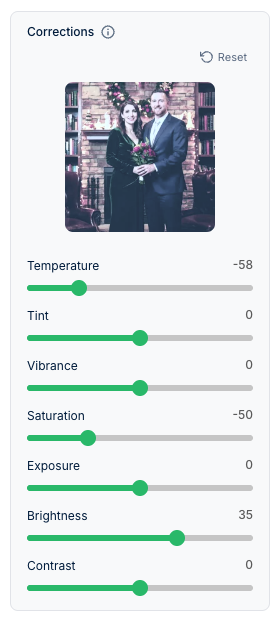
The supplied correction settings show Temperature at -58, Tint at 0, Vibrance at 0, Saturation at -50, Exposure at 0, Brightness at 35, and Contrast at 0. The correction deliberately cools the image, lowers excessive saturation, and raises brightness before the image is enlarged.
The result is still the same couple in the same room, with the same pose and composition. The visual improvement comes from a more controlled palette and brighter tonal balance, plus an enlargement step chosen because the original file is small.
Use the same settings in the API
All of the Light and Color Correction parameters shown in these examples are also available through the API. For the available Advanced options and request structure, see the Advanced Light and Color Correction API documentation.
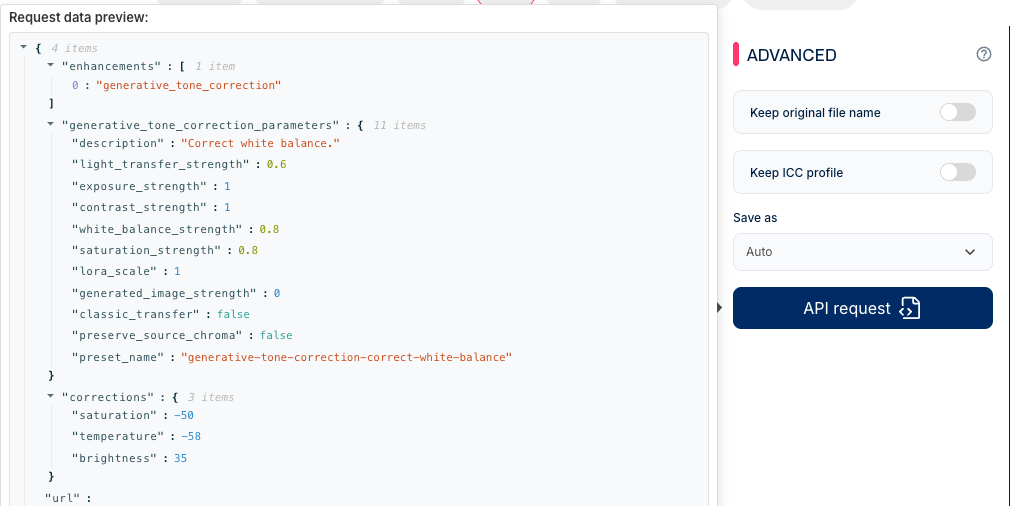
In the Advanced tab of both AI Enhancer Studio and AI Enhancer PRO, you can select API request to preview the request generated from the current settings. The preview can then be copied with Copy API Request, which is useful when you want to move a tested correction workflow into an API integration.
A practical workflow for natural-looking photo correction
- Start with the issue you can name. Decide whether the problem is a blue or warm cast, weak white balance, exposure, contrast, saturation, or image size.
- Correct the look before adding detail. Use Light and Color Correction to bring the image closer to the intended palette and tonal balance while keeping the original content.
- Compare the same image at normal viewing size. Check neutral surfaces, skin tones, bright windows, and deep shadows. Stronger settings are not always better.
- Add upscale only when resolution is limiting the next use. Choose regular upscaling for a larger output, or use Generative Upscale carefully when a small source needs a modest detail lift.
- Keep the original file. Save the corrected version as a new derivative so you can return to the source or try a different correction later.
For images that need broader cleanup as well as light and color work, you can combine this approach with AI Image Upscale. The best workflow is the smallest set of changes that solves the visible problem.
Light and Color Correction in AI Enhancer Studio and AI Enhancer PRO
AI Enhancer Studio is a good fit when you want to work on one photo, compare the effect, and make a careful adjustment. AI Enhancer PRO brings the same Light and Color Correction capability into a workflow for image enhancement at scale.
The feature is particularly useful for user-generated photos, family images, real-estate interiors, event photos, and product images where the scene is correct but the light or palette needs attention. It lets you make a targeted correction without treating every image problem as a reason to generate a new image.
If you want to test it on your own files, start with a photo that has an obvious color cast or exposure issue. Correct the light and palette first, compare it with the original, and add an upscale only when the output size or visible detail calls for it.
FAQ
Does Light and Color Correction regenerate my photo?
No. Light and Color Correction is intended to adjust the lighting and color palette of the input image while keeping its original content, scene, composition, and subject in place.
Can I use Light and Color Correction without upscaling?
Yes. Light and color adjustment works independently of upscaling. Use it when the main issue is white balance, exposure, contrast, or color cast rather than image size.
When should I use Generative Upscale?
Use Generative Upscale when a small image needs additional detail and a larger result. Because it can add inferred detail, start with a low strength and compare the result with the source, especially for faces and other important details.
Which tools include the new correction controls?
The new Light and Color Correction controls are available in AI Enhancer Studio and AI Enhancer PRO.
Correct the photo you have
Many images do not need a new scene. They need better white balance, more controlled color, or a more usable tonal range. With Light and Color Correction in Deep-Image.ai, you can focus on those changes while keeping the input image itself intact.
Open AI Enhancer Studio to correct light and color in a single photo, or use AI Enhancer PRO when your workflow requires the same focused correction across more images.
