AI Print Bleed: How to Extend Flyers and Business Cards for Printing
Learn how print bleed works, explore flyer and business card examples, and add physical bleed margins with the Deep Image API.
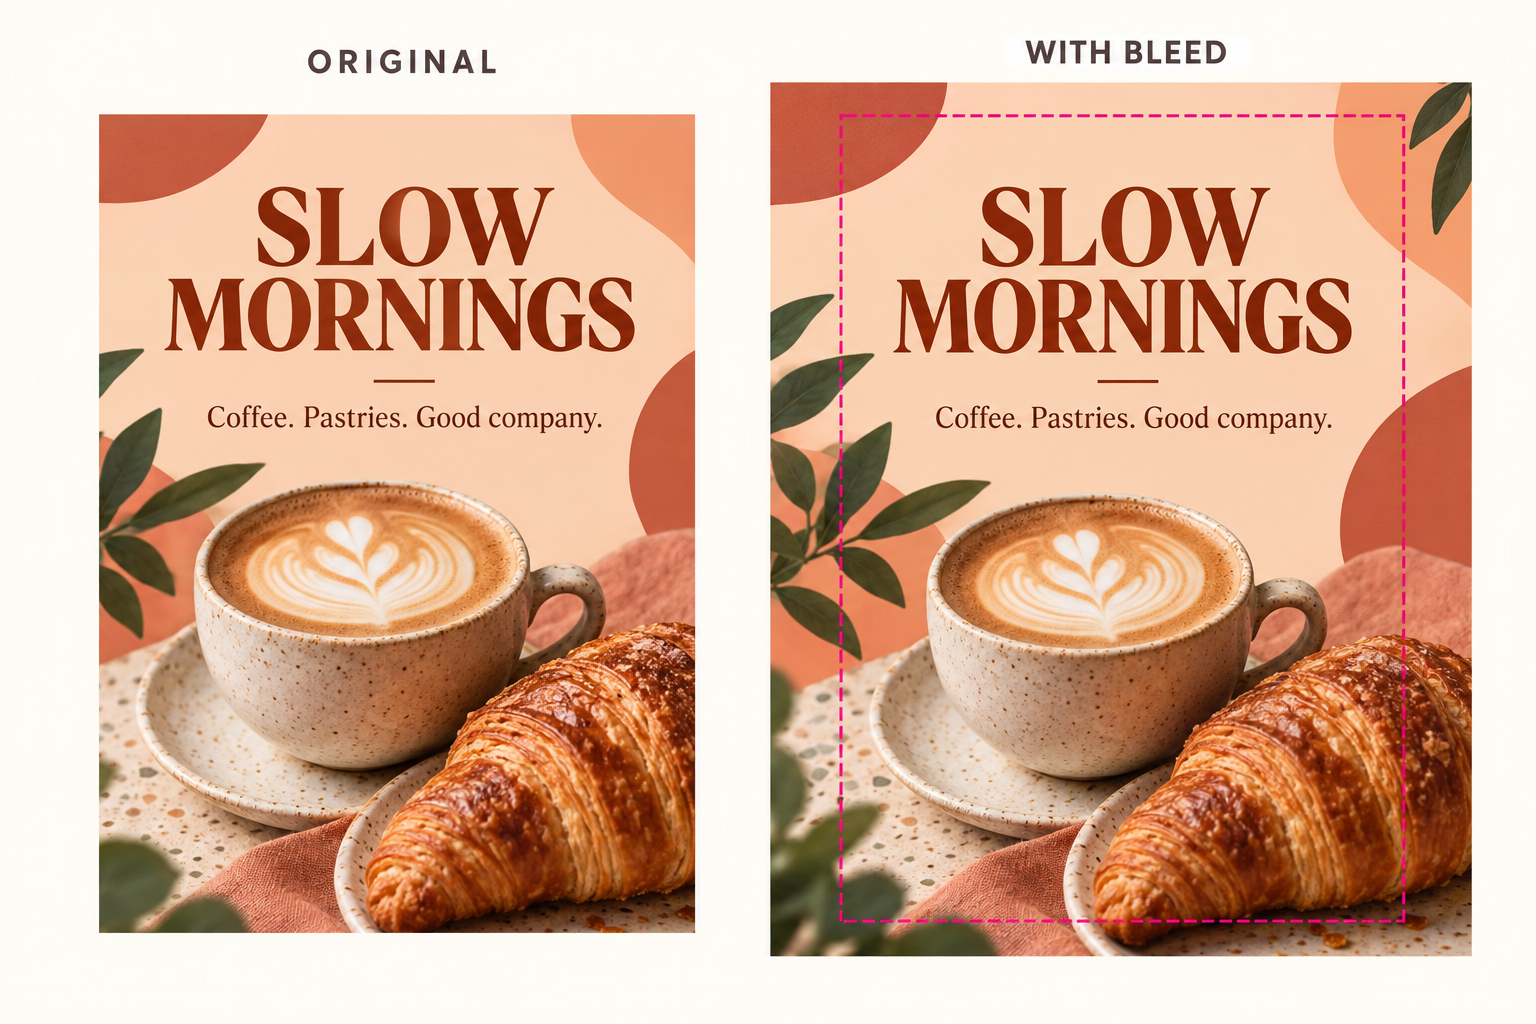
Your flyer looks finished. The photograph reaches the edge, the headline is in place, and the colors work together. Then the print shop asks for a file with bleed—and the only artwork you have is a flattened image at the final size.
This is where AI print bleed can help. Instead of enlarging the entire design or adding a visible border, you extend the background beyond the cutting line. Deep Image's Bleeding preset keeps your original artwork and generates the missing outer area to match its edges.
Let's look at what bleed does, how it differs from a safe margin, and how to approach three common designs: a café flyer, a business card, and an event flyer.
What is bleed in printing?
Bleed is extra artwork outside the finished page boundary. After printing, that outer area is cut away. It gives the cutter a little room to move without exposing an unintended white strip at the edge.
Three boundaries matter:
- Trim: the intended edge of the finished piece.
- Bleed: the continuation of edge-to-edge artwork outside that edge.
- Safe area: the space inside the edge where you keep headlines, logos, contact details, and other essential content.
Bleed and the safe area solve different problems. Adding artwork outside a card will not move a phone number away from its cutting line.
Many printers request around 3 mm or 0.125 inches of bleed per side. These are common alternatives, not exact equivalents: 0.125 inches is 3.175 mm. Use your printer's specification. Adobe's print bleed guide explains the setup and the need to extend edge artwork into that area.
How much larger should the artwork be?
Add the requested bleed twice to each dimension: once for each opposing edge. For these examples, assume the printer requests exactly 3 mm on every side.
| Design | Finished size | Artwork including bleed |
|---|---|---|
| Business card | 85 × 55 mm | 91 × 61 mm |
| A6 flyer | 105 × 148 mm | 111 × 154 mm |
| A5 flyer | 148 × 210 mm | 154 × 216 mm |
Those enlarged dimensions describe the artwork area; a PDF with printer's marks may have a larger outer page. The trim size remains the intended finished size.
Example 1: a café flyer with a photograph at the edge
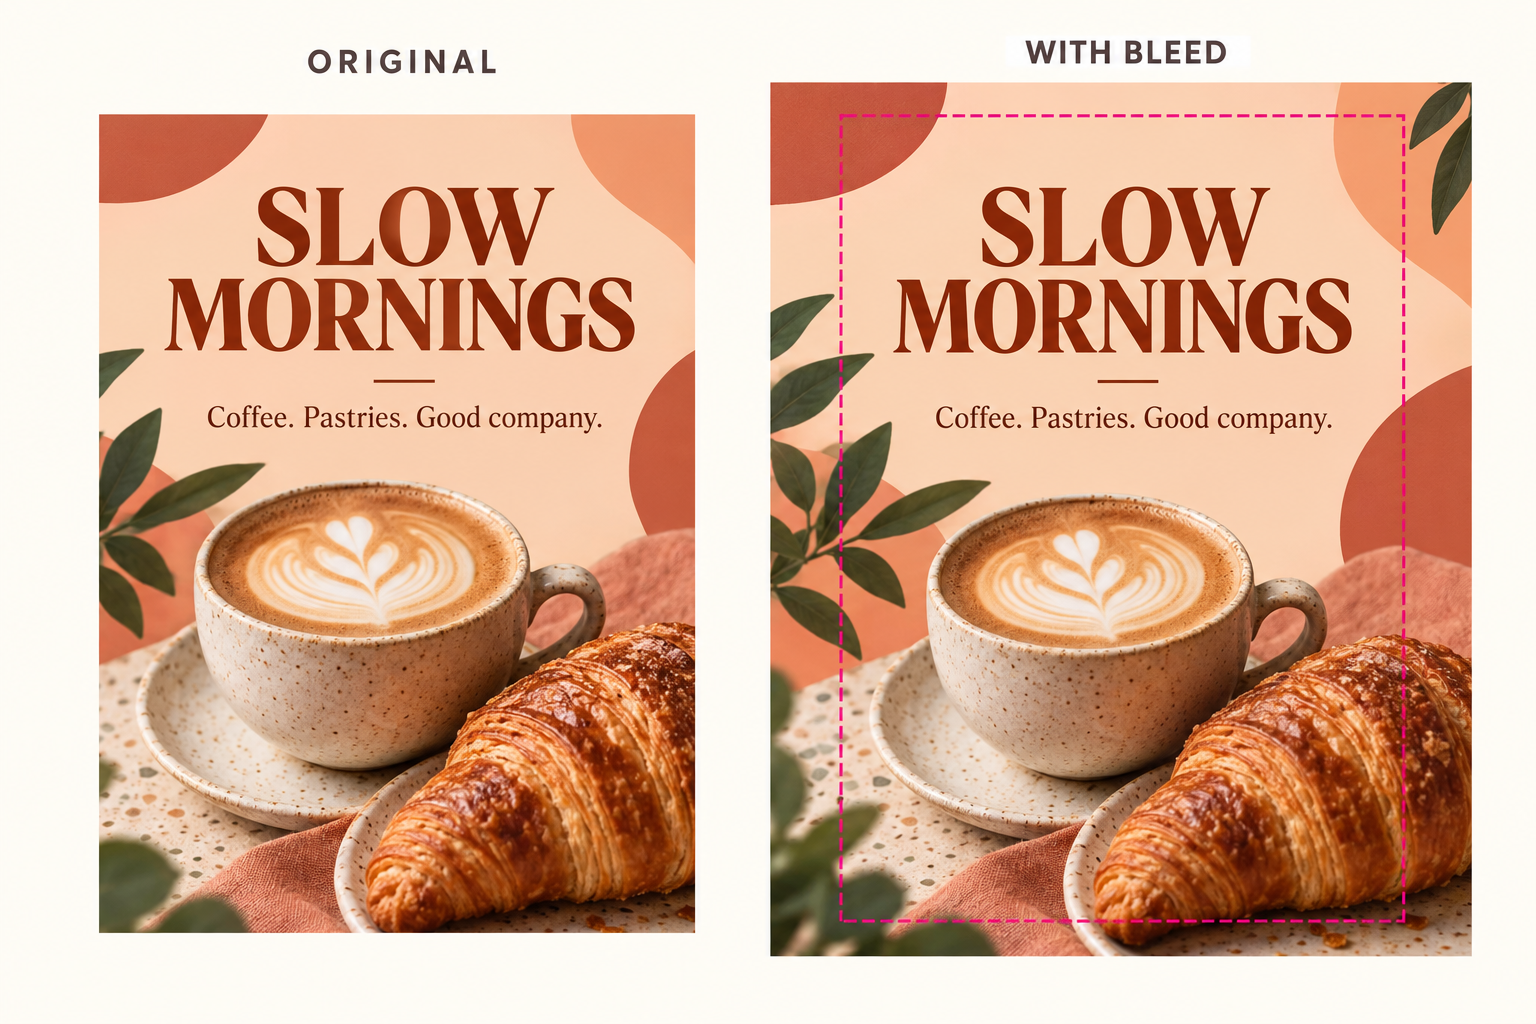
A photograph of coffee and pastries makes a natural full-bleed composition. But when the image ends exactly at the trim line, there is no spare picture to cover a small cutting variation.
Stretching the whole flyer would enlarge the cup, change the layout, and push the headline closer to the edge. An extension instead adds picture area around the existing composition.
What to inspect: the edge of the cup, the table texture, and the shape of the pastry where the original meets the extension. The continuation should feel like the same scene. Keep the headline inside the printer's safe area.
Example 2: a business card with a dark background
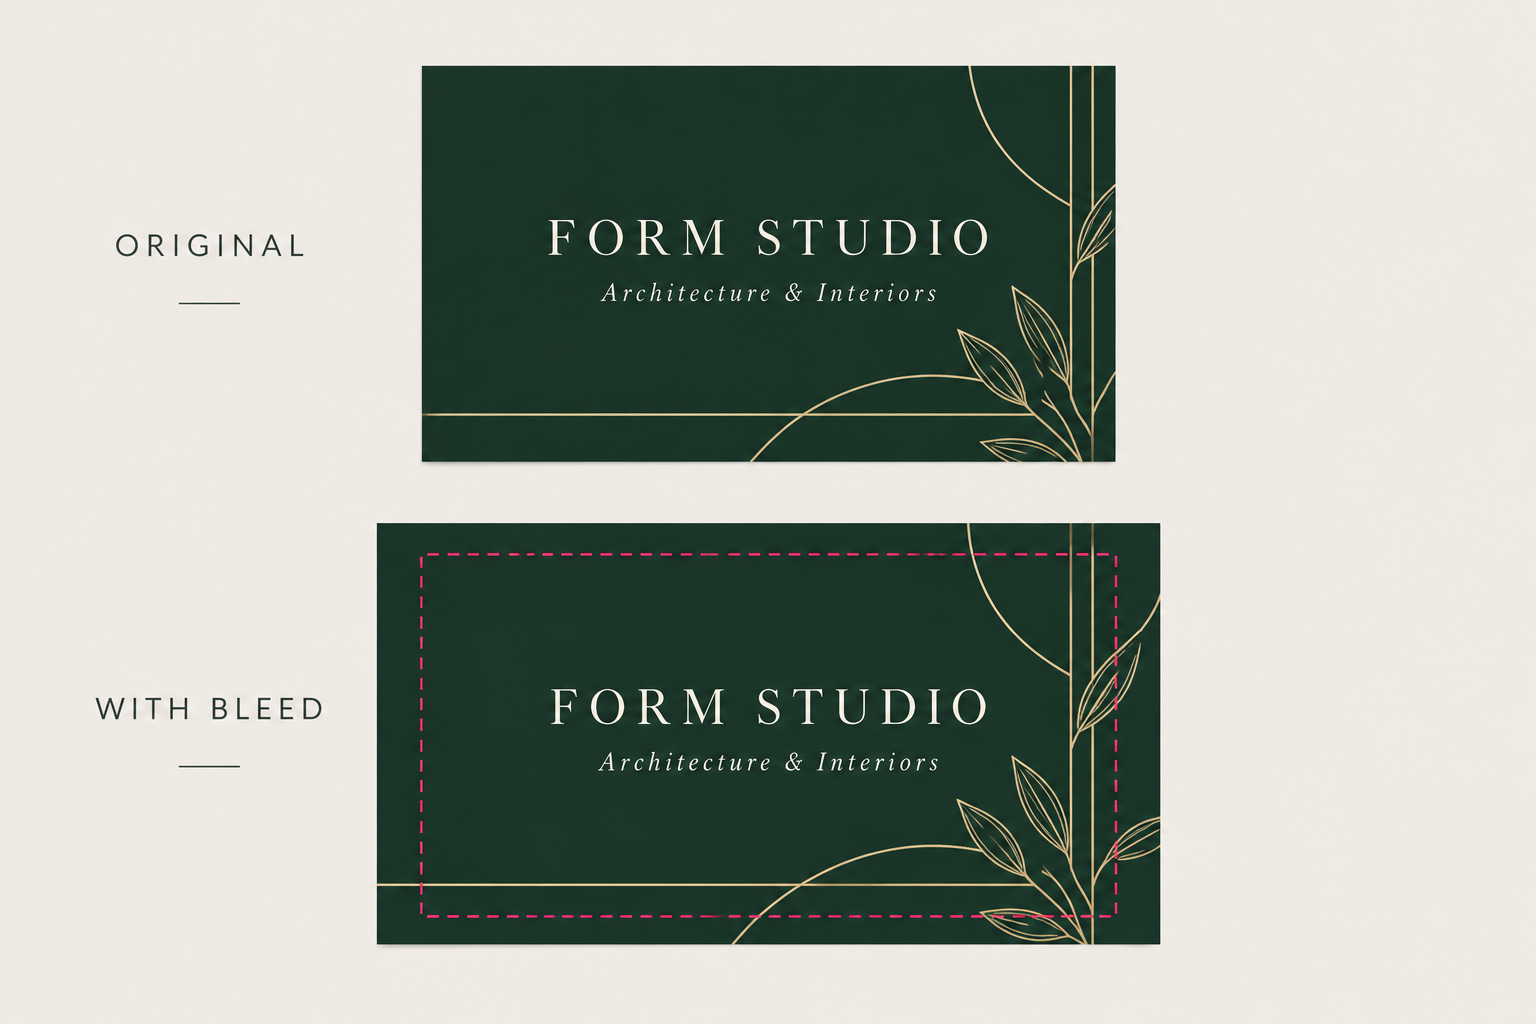
A dark card makes an accidental white sliver particularly noticeable. For a uniform background in an editable file, extending the background rectangle in your design application is usually the most direct solution.
AI becomes useful when the supplied artwork is flattened and includes texture, gradients, or ornaments crossing the edge. Those elements need a coherent continuation rather than a plain band of color.
What to inspect: changes in the green tone, doubled gold lines, and bends where an ornament crosses the trim boundary. Read every character in the original artwork again. Contact details and QR codes should remain comfortably inside the safe area; never depend on generated content to reconstruct them.
Example 3: an event flyer with flowing graphics
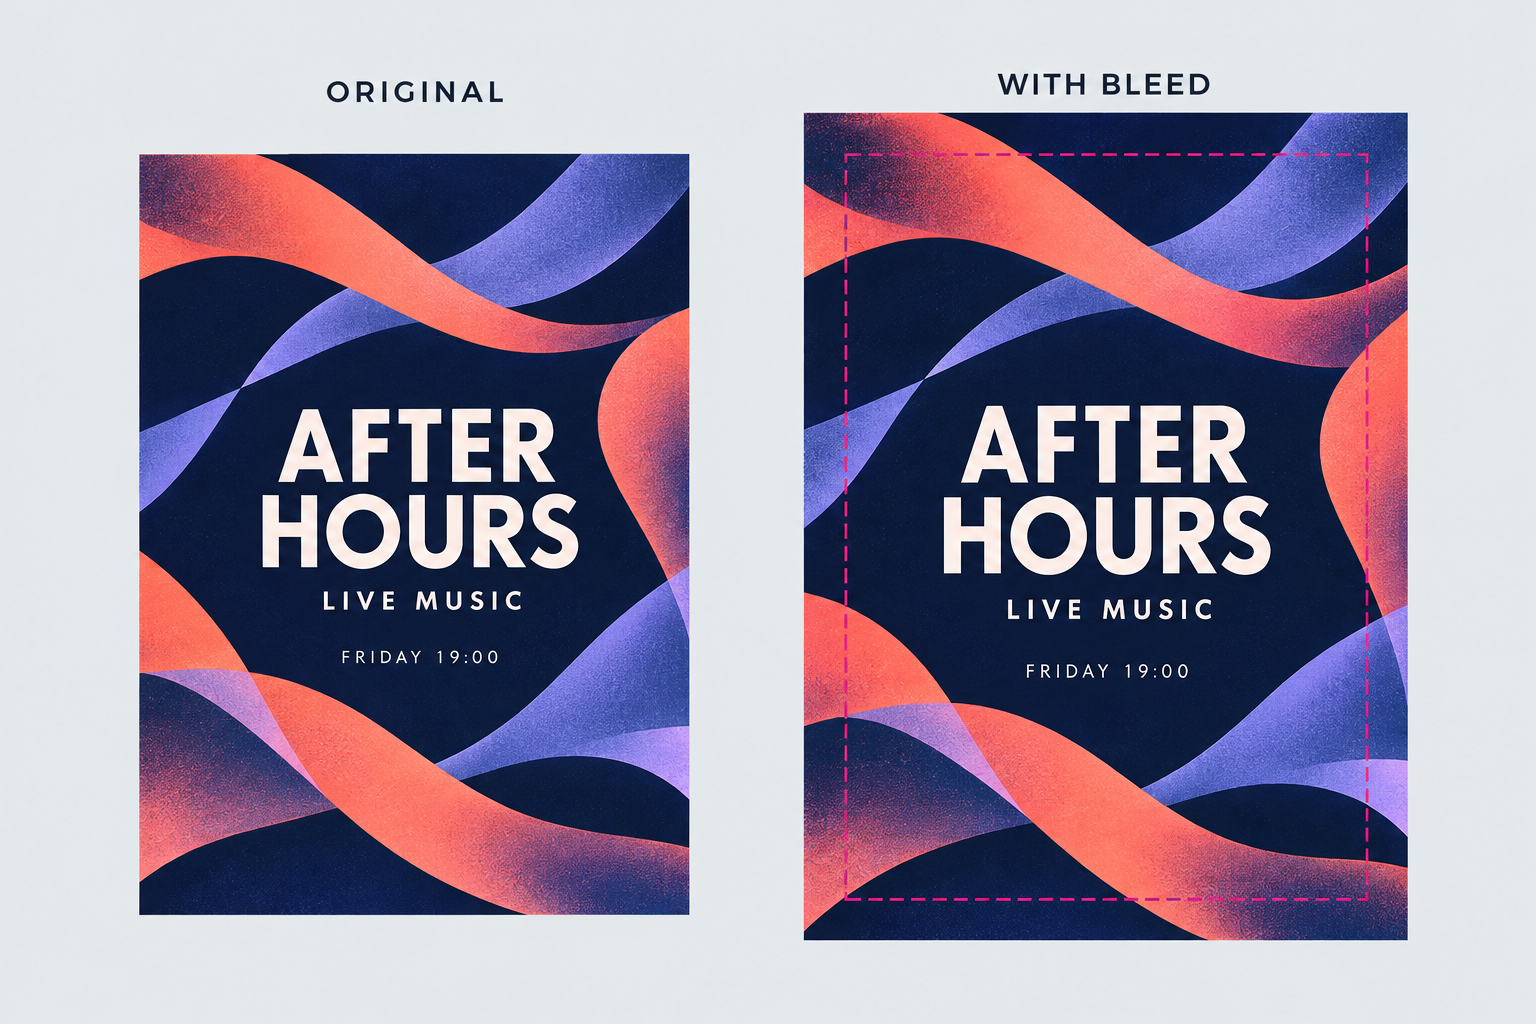
Abstract ribbons and gradients can make a flyer feel energetic, but they also make joins easy to spot. A line that changes direction abruptly can remain visible after a slightly shifted cut.
What to inspect: the direction and thickness of each ribbon, continuity of the gradient, and any repeated texture at the join. Inspect all four corners as well as the straight edges.
Add bleed with the Deep Image API
Deep Image includes a bleeding preset for extending raster artwork around its existing footprint. For an explicit physical margin, specify the padding in inches and the intended image density. For example:
{
  "url": "https://deep-image.ai/blog/content/images/2026/10/wikimedia-business-card-bleed-input.png",
  "preset": "bleeding",
  "padding": "1/8in",
  "dpi": 300,
  "output_format": "png"
}
This working example uses a 600 × 1050 pixel business-card back design. Replace its URL with your own artwork when needed. This JSON is the processing payload; use the authentication and submission workflow in the Deep Image API documentation.
Sample artwork: Wikimedia Foundation business-card back (alternate 3) by Mightyquinn84, licensed under CC BY-SA 4.0. Rehosted without design changes. This sample does not imply endorsement by Wikimedia.
Here, 1/8in requests a margin on each side. At 300 pixels per inch, that becomes 38 pixels per side after rounding. The 600 × 1050 pixel sample therefore becomes 676 × 1126 pixels. The source footprint is not enlarged to fill the new canvas.
Physical padding requires a valid image density: provide dpi explicitly, or use a source with valid DPI metadata. Assigning a DPI value does not create detail; it determines the relationship between pixels and physical size. Use the density that matches your intended trim size.
Do not treat percentage padding as a substitute for a printer's physical specification. If your printer asks for exactly 3 mm, calculate and verify the corresponding pixels at the chosen density instead of silently substituting 1/8 inch.
The key advantage of Deep Image Bleeding is that it keeps the original artwork and fits the generated bleed to its edges. Your existing design, typography, and composition remain the reference; the surrounding area is generated to continue their colors, textures, and shapes. Inspect the added margin and its joins before exporting the final print file.
Actual result: the sample business card with added bleed
Compare the original artwork with the supplied processing result. The image grows from 600 × 1050 to 676 × 1126 pixels, matching a nominal 38-pixel margin per side. Both images are displayed at the same scale.


Open the full-size result to inspect the added bleed and its joins with the original. Deep Image keeps the original artwork and matches the generated outer area to it, extending the design beyond the trim boundary.
Original artwork by Mightyquinn84: Wikimedia Foundation business-card back (alternate 3). Original and AI-extended derivative: CC BY-SA 4.0. The derivative adds bleed around the original artwork. No Wikimedia endorsement is implied.
Finish the print file in your layout application
The extended image is an asset for the print workflow. Place it at the correct physical scale in your layout, align the original footprint with the intended trim area, and keep the extra artwork outside it. Keep editable text and logos as separate vector elements when the source allows it.
Export using the PDF preset, color profile, and bleed settings requested by your print provider. Add crop marks only when requested. Adobe's PDF export reference describes the separate controls for marks, bleed, color conversion, and output profiles.
An extended PNG does not by itself define a PDF TrimBox, embed a required CMYK output intent, or make a file PDF/X compliant. Those steps belong to document preparation and preflight.
A quick check before you send it to print
- Confirm the finished dimensions, bleed on each side, and required safe area.
- Verify the pixel dimensions and physical scale of the extended artwork.
- Inspect all edges and corners for color seams, distorted shapes, or duplicated details.
- Check the original text, logos, and any machine-readable codes.
- Reopen the exported print file and verify its trim and bleed boundaries.
- For a critical job, approve a proof before the full run.
Already have a flattened flyer or business card that stops at the cutting line? Explore Deep Image for print workflows and use the Bleeding API preset to prepare the missing outer artwork. For larger photographic work, see our guide to preparing digital art and photos for large-format print.

